 |
Thermal Camera SDK 10.0.1
SDK for Optris Thermal Cameras
|
|
Thermal Camera SDK 10.0.1
SDK for Optris Thermal Cameras
|
The SDK itself is implemented in C++ but offers bindings to other language like C# and Python 3. One of the first decisions you have to make is to choose the programming language with which you want to interact with the SDK. The bindings offer full access to the exposed C++ API. However, there are some minor omissions due to technical restrictions of the target languages. Their impact on the available feature set is negligible.
The following table lists some use cases as well as some downsides for each language and is by no means exhaustive:
| Language | Use Case | Downsides |
|---|---|---|
| C++ | Lowest latency and maximum performance | Complexity |
| C# | GUI application development | Minor performance penalties due to bindings |
| Python 3 | Prototyping and data science | Not suitable for high performance demands (slow function calls, global interpreter lock) |
The bindings are automatically generated with the help of SWIG and always consist out of the to following parts:
With C++ you first of all require a compatible compiler to translate your project into an executable or a library. With regards of your operating system the SDK supports the following compilers:
In addition to the compiler you need to choose which build system you want to use. The SDK supports the following options out of the box:
On Linux the native package manager apt will automatically install the GNU compiler and CMake as dependencies of the SDK package.
On Windows you can easily use either the built-in capabilities of Visual Studio or you can use CMake. Regardless of your choice you need to install the Microsoft Visual C++ compiler. Navigate to the Visual Studio website and download the installer. The following descriptions are based on the freely available Community Edition 2022:
Workload Desktop development with C++ 
Individual components and scroll down to the section Compiler, Buildtools and Runtimes and select the following additional components:Visual Studio core editor, if you wish to use another IDE/code editor.If you want to use CMake as the build system, you have to visit to the CMake website to download their Windows installer. Run it to install CMake on your system.
The C# bindings of the SDK are generated based on the .NET SDK LTS version 8.0. Therefore, you need to install this SDK along with its corresponding runtime. On Linux you can conveniently to do this with the help of the native package manager apt. Just run the following command:
On Windows you can refer to the Visual Studio installer to get both the .NET SDK and runtime. Navigate to the Visual Studio website and download the installer. The following descriptions are based on the freely available Community Edition 2022:
Workload .NET desktop development 
Visual Studio core editor, if you wish to use another IDE/code editor.In order to use the Python 3 bindings of the SDK you require the Python 3 interpreter and the NumPy library.
Linux
On Linux the bindings are compiled against the default Python 3 and NumPy versions provided by the official APT repositories. Therefore, the recommended way to install the required dependencies is the native package manager apt. Run the following command:
_otcsdk_python.Windows
On Windows the native part of the Python 3 bindings requires at least the following versions of Python 3 and NumPy:
ImportError: DLL load failed while importing _otcsdk_python.Since Windows lacks a central software manager you first have to download the Python 3 installer from its website. After the installation you can use the built-in package manager pip to install NumPy:
To manipulate and and view false color images you may need an additional library like OpenCV. You can install it with the help of the package managers:
Linux
Windows
Depending on your chosen build system, CMake or Visual Studio, you have to take a different approach.
Open your CMakeLists.txt file and add the following find_package() command to instruct CMake to locate the SDK resources:
Then add the library target otcsdk::otcsdk to the target_link_library() command for your build target (here named myTarget):
In this way you build your target against the shared version of the SDK library. If you wish to link statically, use the library target otcsdk::static instead.
To compile your CMake project go to the root directory of your project, create a build directory and change into it:
Command CMake to generate the build files and trigger the compilation process:
--parallel option with the second command to speed up the compilation process. Make sure, however, that you have enough memory to support all the resulting compilation processes.The Windows SDK installer automatically sets up the system wide environment variable OTC_SDK_DIR that holds the path to your chosen installation directory. You can now use this variable to conveniently setup your Visual Studio C++ project.
After you created a C++ project in Visual Studio open the project properties and modify the following settings:
General pageC++ Language Standard to ISO C++17 Standard (/std:c++17).VC++ Directories page$(OTC_SDK_DIR)\include to the Include Directories.$(OTC_SDK_DIR)\lib to the Library Directories.Input page of the Linker categoryotcsdk.lib to the Additional Dependencies.With this setup you build your project against the dynamic version of the SDK library. If you wish to link statically against the SDK, you will have to adjust the following settings:
Input page of the Linker categoryAdditional Dependency to otcsdk_static.lib instead of otcsdk.lib.Preprocessor page of the C/C++ categoryOTC_SDK_STATIC to the Preprocessor Definitions.OTC_SDK_STATIC ensures that the macro OTC_SDK_API controlling the Windows DLL symbol export and import in the SDK headers is empty. For more details on this subject refer to the MSVC documentation.Create a subfolder classes in your C# project and copy the wrapper C# classes from the SDK install directory to it. They are located in
<SDK Installation Directory>\bindings\csharp\classes on Windows and in/usr/share/otcsdk/csharp/classes on LinuxThe .NET runtime locates and loads the depended shared libraries automatically.
To use the SDK with Python 3 you just need to import the SDK module into your code:
Nothing more needs to be done.
The following UML diagram illustrates the class structure of the public SDK API. All the details about the class members are omitted to ensure it is clear and easy to understand.
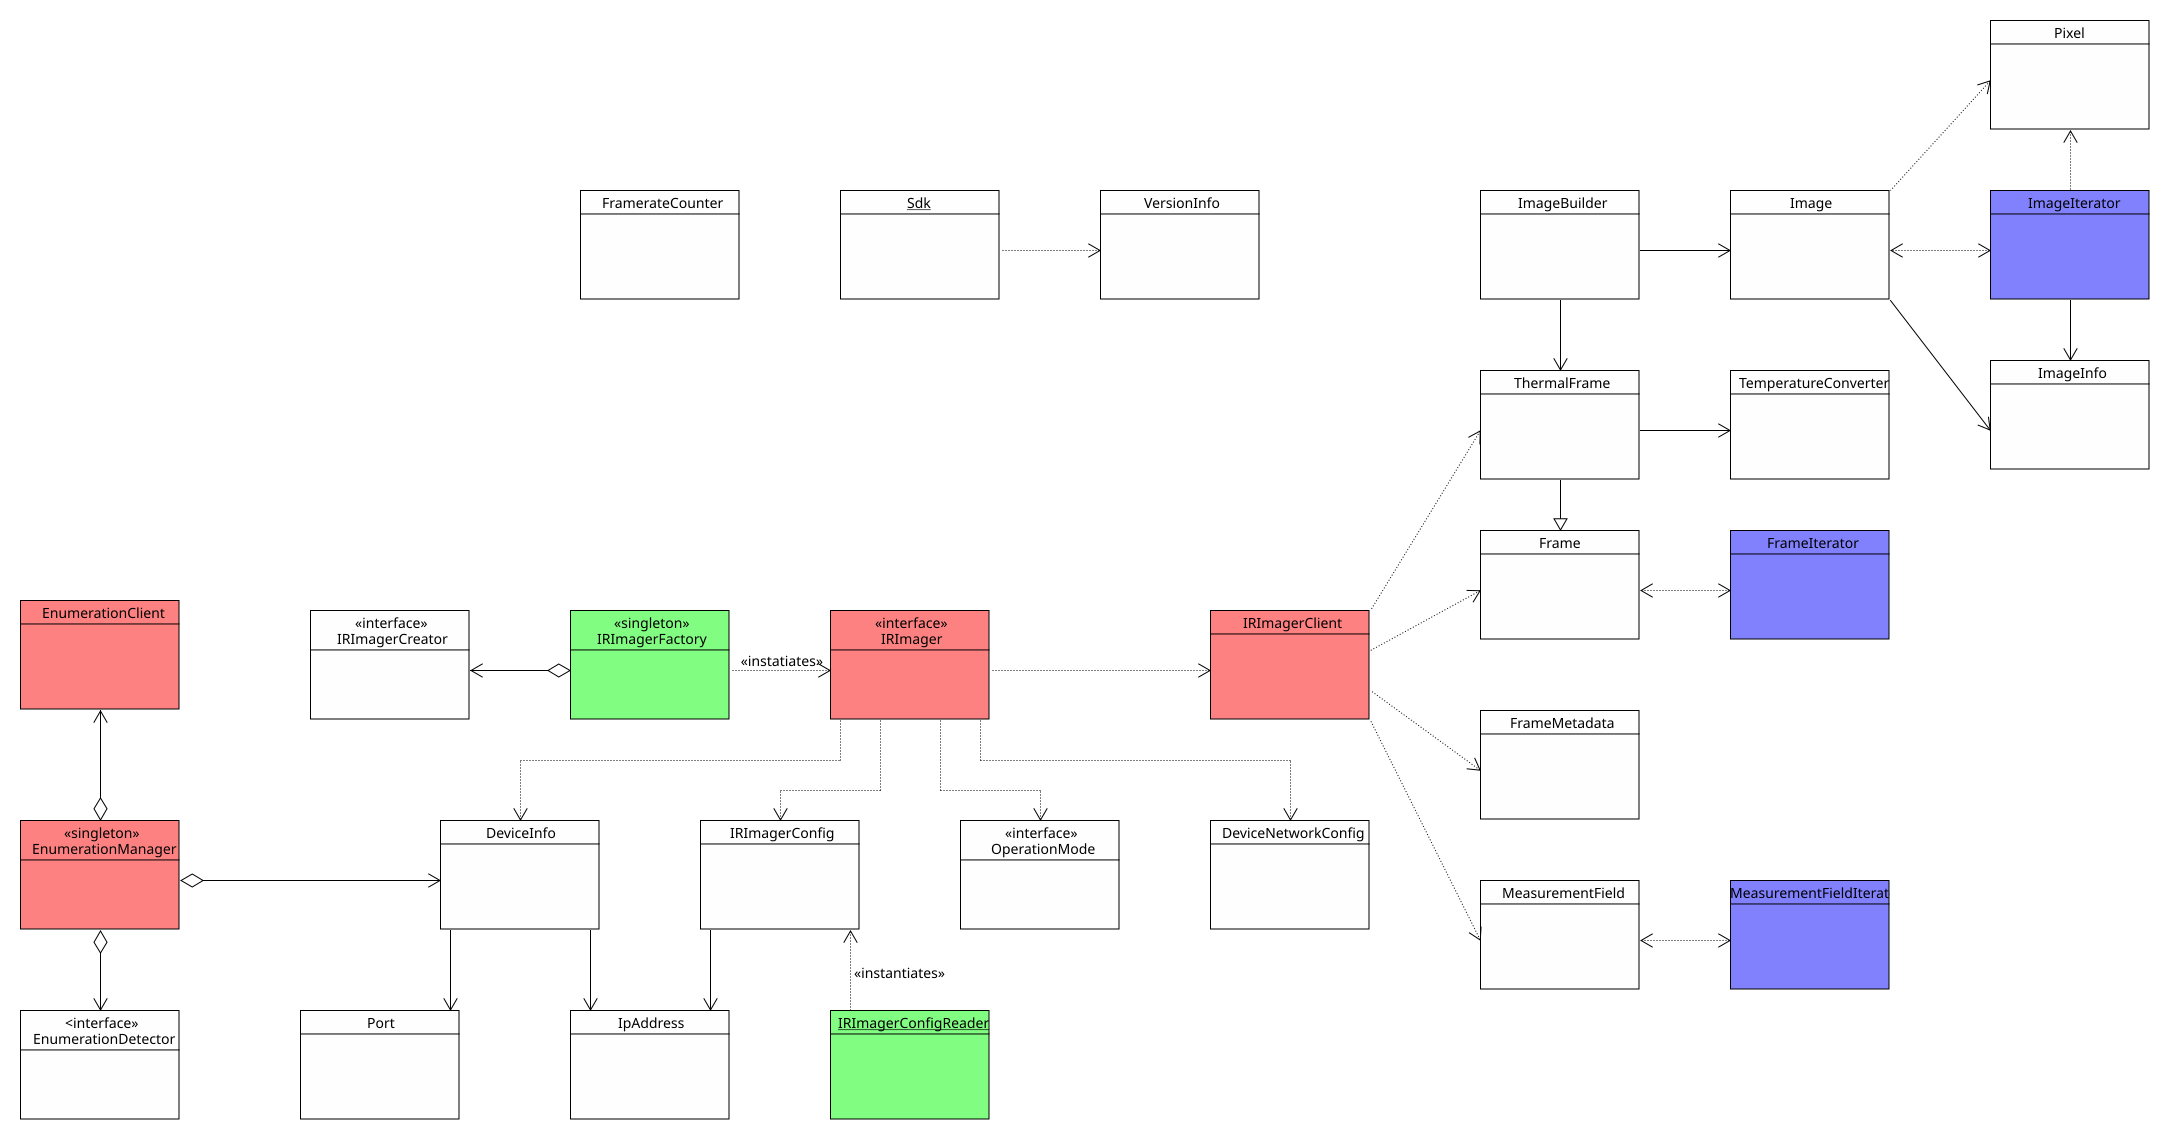
A number of design patterns are employed to make the API easy to use. They include but are not limited to
Observers (red)
The SDK features two Observer structures. The most important one is constituted by the IRImager interface and the IRImagerClient. Each IRImager instance represents a single thermal camera and its interface defines how you can interact with it. By registering a child class of the IRImageClient with the addClient() method you can receive processed thermal frames, flag states and other status information. To process this data implement the corresponding callback methods defined by the IRImagerClient in your child class.
The EnumerationManger uses the same pattern to inform EnumerationClient classes of newly attached or removed devices.
Both client classes feature empty default implementations for the callbacks they define. Therefore, you only need to override the callbacks that you need.
Factories (green)
Factories encapsulate the instantiation of classes. The public API features two such factories: The first one is the IRImagerFactory that creates objects of classes that implement the IRImager interface based on a provided string. By requesting a native instance you get an IRImager implementation that can interact with thermal cameras via USB and Ethernet.
The second factory loads a configuration files from the given path and returns an IRImagerConfig object with the read configuration values.
Iterators (blue)
The iterator classes are designed to offer a uniform and convenient way to iterate over the data values stored in Frame, ThermalFrame, MeasurementField and Image objects. However, they do not offer the best performance for this purpose particularly in programming languages that are supported via bindings.
For more details on efficient ways to access thermal and image data please refer to the sections Retrieving Thermal Data and Creating False Color Images.
Singletons
Both the IRImagerFactory and the EnumerationManager are Singletons. This means there can only be one object per class and per application. To access this object you have to call the static method getInstance().
Static Classes
Apart from the design patterns there is another important class: the static Sdk class. It contains the init() method required to initialize the SDK, methods to manipulate some SDK wide behavior and access to VersionInfo objects holding version and build information.
As illustrated in the previous section, the SDK uses an Observer pattern to relay the latest thermal data to a client. This primarily happens via the following method of the IRImagerClient class (C++):
The thermal data is encapsulated in an object of the ThermalFrame class while a FrameMetadata object holds its corresponding metadata. There are a few important things to note:
The method does only provide references (&) to these objects. Those will remain valid while the IRImager instance is connected to a device. In other words, the ThermalFrame and FrameMetadata objects remain the same while a connection is active. Their content, however, will be constantly updated and will only remain the same while the method is called.
If you wish to use the ThermalFrame data or the FrameMetadata later on or in a different thread, you will have to make an explicit copy.
clone() methods of the ThermalFrame and FrameMetadata classes to ensure an explicit copy is created.The provided references are const. This means you can not manipulate the objects to which they are pointing to. You have only read access.
const qualifier is typically not mirrored in the bindings of the other supported programming languages. Thus, it may appear that you can manipulate these objects but this will certainly lead to errors.onMeasurementField() and onThermalFrameEvent() methods of the IRImagerClient class.The ThermalFrame object contains the measured temperatures for each pixel in an internal format. These values are represented by unsigned 16 bit integers. You can convert the internal values into degree Celsius with the help of an TemperatureConverter object. Retrieve it for every ThermalFrame with the getConverter() method.
TemperatureConverter objects that you instantiated yourself but retrieve them from every ThermalFrame you process. This is necessary because the internal values differ depending which TemperaturePrecision is currently active.You have multiple ways to access the thermal data that is internally stored in a one-dimensional array:
getValue() methods to access the internal temperature values for individual pixels.getTemperature() methods to access the temperature in degree Celsius for individual pixels.getConstIterator() method to get an iterator that allows you iterate over the entire frame.The iterator is convenient but does not offer the best performance particularly in programming languages that are supported via bindings. The most efficient ways to access the thermal data are:
getData() method to acquire a const pointer to the internal temperature value of the first pixel. All the values are stored in one continuous section of the memory like they would in a standard C array.copyDataTo() method to copy the internal temperature values to a ushort[] array. Make sure it has at least the size returned by the getSize() method.copyDataTo() method to copy the internal temperature values to a two-dimensional NumPy array with the shape (getWidth(), getHeight()) and the data type uint16.MeasurementField objects.You can easily convert a ThermalFrame into a false color image with the help of an ImageBuilder object. The resulting images have three channels: red, blue and green. Each channel has a color depth of 8 bits. The color values are stored in a continuous one-dimensional array. When setting up the ImageBuilder there are few things to consider:
The ColorFormat defines the sequence in which the individual color values for each pixel are stored in the image array. If set to RGB, the value for red will have the lowest index and the value for blue will have the highest. With BGR things are the other way around.
RGB and BGR this way.WidthAlignment specifies whether the size of each row/line in the resulting image should adhere to a specific alignment. For example the FourBytes alignment ensures that the size of every row/line in bytes is a multiple of four. If this is not the case out of the box, padding bytes will be added at the end of each line. Some libraries depend on a certain alignment to efficiently read image data.ColorPalette defines with what set of colors the different temperatures are represented. Refer to the API documentation of the ColorPalette enum to get an idea what options are available.PaletteScalingMethod specifies how the ColorPalette gets applied to the temperature spectrum found in a ThermalFrame.Once the ImageBuilder object is set up you can set the ThermalFrame to convert with the setThermalFrame() method. Trigger the conversion with convertTemperatureToPaletteImage() and access the result with getImage(). The image data is encapsulated in an Image object.
getImage() method returns only a reference to the Image object that grants read access. If you want to retain a copy in languages other than C++, use the clone() method to force an explicit copy. Keep in mind that you can not manipulate the referenced Image object even if the API of the bindings may suggest it.You can access the image data in different ways:
getPixel() methods to get a Pixel object containing the color values.getConstIterator() method to get an iterator that enables you to iterate over the image pixel by pixel.The iterator is more convenient than the ones for the thermal data because you do not need to worry about the order of the color values and potential padding bytes. It shares, however, the same downsides. Therefore, the SDK provides more efficient ways to access the image data:
getData() method to acquire a const pointer to the color value array. All the values are stored in one continuous section of the memory like they would in a standard C array.copyDataTo() method to copy the color values to a byte[] array. Make sure it has at least the size returned by the getSizeInBytes() method.copyDataTo() method to copy the color values to a three-dimensional NumPy array with the shape (getWidth(), getHeight(), 3) and the data type uint8.ImageBuilder offers the shortcut methods copyImageDataTo() and getImageSizeInBytes() that allow you direct access the data of the Image object.